Deploy your static web app on local using kubernetes

Photo by buddy.works
Our tech industry has always promoted great innovations by adopting it for better, quicker and reliable performance. Kubernetes, known as k8s, has been one of those popular tools that has gained huge importance and community support in recent years.
In this blog, we will be looking into setting up a local kubernetes cluster, understanding required architecture & components and actually deploying a static website on it.
Overview of tools & concepts
- Docker
- Docker is an open-source tool that provides feasibility to create, package, run the software/application independent of the underlying infrastructure
- It provides the best option to isolate the application and be executable irrespective of different environments
- To understand docker thoroughly, please check upon this detailed Docker architecture in their documentation.
- Docker Image
- Docker Image can be called a static template or blueprint of an application that is created using instructions mentioned in a file called Dockerfile
- Docker Images are in a layered structure where each RUN command in Dockerfile will append new layer on top of previously executed command
- Docker CLI commands can be used to building the image and performing various operation.Below are the references:
- Docker Container
- Running instance of Docker Image is called as Container
- Docker is also called as Containerization tool where application images are self-contained with all pre-requisites of source code, libraries, configurations, dependent packages, etc..
- Docker Registry
- Docker Registry is the storage for Docker Images from where we can pull and push docker images
- Docker Hub is the default public registry where the user’s can push their local images or pull the publicly available remote images
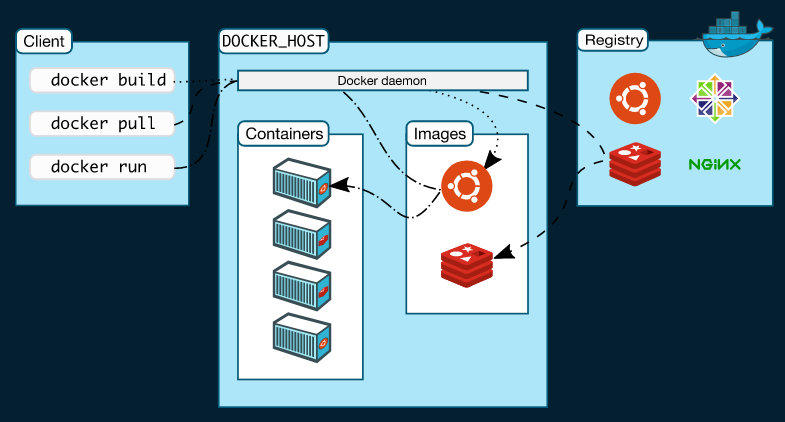 |
|---|
| Docker Overview (Photo by docs.docker.com) |
- kind
- kind called as kubernetes in docker
- There are multiple tools used which helps in creating k8 cluster on local system for setting up development environment
- kind can create, manage , run the k8 local cluster using docker container as k8 nodes
- make
- make is a build tool which ease the creation of executables from source code or executes set of programs/instructions/commands which are written in Makefile
- Each block in Makefile is referred as target where set of instruction are executed
#!/usr/bin/env make .PHONY: test_target test_target: dependent_on_target command1 && \ command2 - Command to execute any target :
make <target name>
- kubectl
- It is a command line tool using which commands can be executed on Kubernetes clusters
kubectlis a CLI that is run with many options available for managing or getting descriptions for any components of k8(pods, deployments, services, ingress, configMap, etc…)- In the backend,it makes an API call to performs all managing actions on k8 clusters
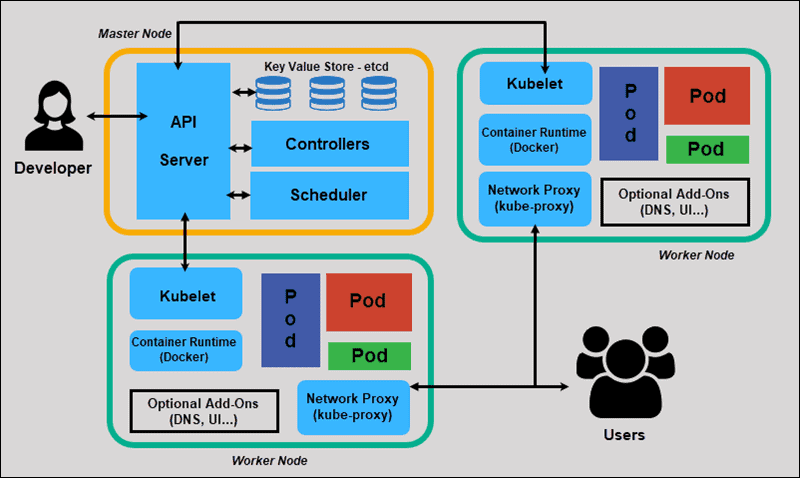
- Kubernetes manifest/components
- Pods
- In the K8 cluster the applications are deployed as containers on worker nodes
- They are not deployed directly on worker nodes -> ENCAPSULATED in k8 object called POD
- POD is a single instance of an application, the smallest object that can be created in the K8 cluster
- Deployment
- k8 Deployment is an encapsulation of Pods where its manifest declaration includes which image to be used, the number of Pods(application containers) to be run, number of replicas for the same application to maintain high availability
- Deployment provides features:
- Rolling Updates (Pods are replaced in rolling fashion ensuring high availability of application)
- Seamless Undo/Resume changes
- Rollbacks
- Deployments encapsulates ReplicaSet –> Deployment( ReplicaSet ( Pod ( Container ) ) )
- Service
- Pods are dynamically created and destroyed due to which it does not have a persistent IP address
- However, the Deployment component abstracts the pods but internal access to the pods cannot rely on the dynamic change of pods lifecycle(creation & deletion)
- Here comes a resource of k8 called as Service which logically group the pods with
selectorkeyword - The multiple micro-services within the k8 cluster can access other applications(pods) through the Service component as a point of re-direction

Kubernetes Overview (Photo by phoenixnap.com) - configMap
- It is a component which enables us to consolidate data(non-confidential) and be stored as a key-value pair and can be consumed by other manifests(deployment/service/etc.. yaml files) of the application
- The referencing of the key in other manifest yaml file can be done as below with env block
valueFrom:
  configMapKeyRef:
    name: <name of the configMap where key-value pair is manintained>
    key: <key name mentioned in configMap>
- Ingress
- Ingress act as Reverse Proxy in the k8 cluster
- It’s the resource that is an interface between the outside network(external access) and the Kubernetes cluster
- So if the outside world needs to interact/access any application in the k8 cluster their request will go through the ingress component
- An Ingress manifest includes the hosts, re-direction path or rules that will internally make a request to the Service component
- Ingress Controller
- An Ingress controller is required to manage and controls the ingress component
- It defines how ingress should work
- Example: AWS Load Balancer controller which controls the Elastic Load Balancing for K8 clusters
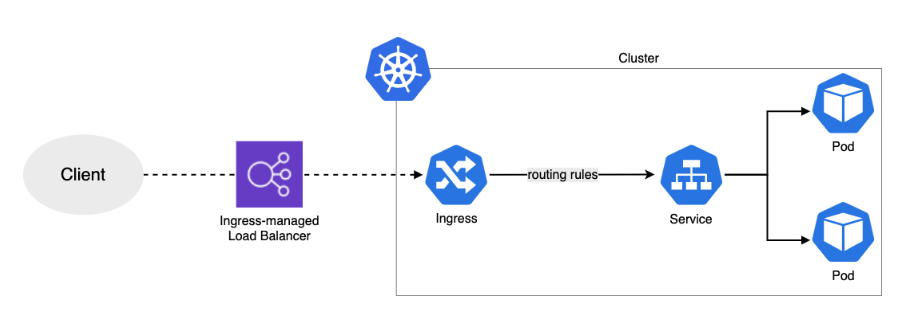
Kubernetes Ingress Overview (Photo by eksworkshop.com)
- Pods
- helm
- Helm is a package manager for Kubernetes apps
- Configuring the manifest of kubernetes individually is not the best option when it comes to setup app in different environments with chances of deploying frequently
- k8 manifests is a yaml description of different component required by the app. It can be packaged together as helm package with some standard directory structure
- Below is a sample example of any helm package archive
chart_name/ Chart.yaml : (includes metadata, name , description of chart) values.yaml : (includes key:value pair which are templatise in the manifest yaml file) templates/ : (includes templatise manifest yaml file for each k8 component required by the app) charts/ : (includes dependencies charts for the app) - Helm provide feasibilty to manage, configure, deploy application in k8 using helm CLI
Example:helm install <chart_name>
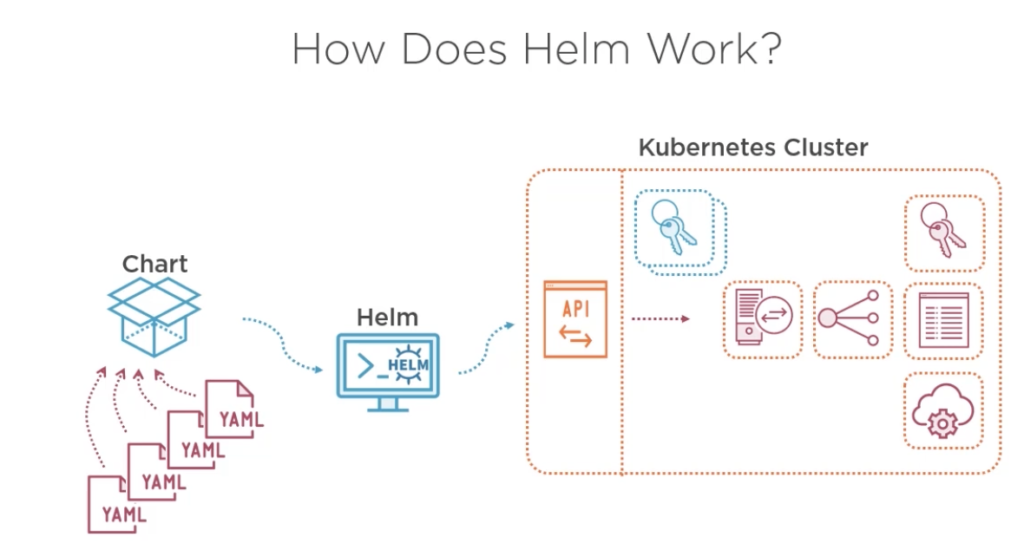
Helm Overview (Photo by regner.com.mx)
Hosting Your Static Web Application On Local
Now without any further delay let’s hop into deploying your static website on local kubernetes cluster.
Get The Template
To ease up the process, we will use a boiler-plate which is specifically created for our use case and clone it in our local machine. The README.md file gives a step-by-step approach for making your static website up and running on local.
- Login to your github account
- Open this repository in new tab
- Click on Fork on the top right corner
- Scroll to the end and click on Create Fork
- Now the repository is in your github account. Click on Clone and copy the URL
- Open a terminal window on your machine and run
git clone <copied_URL>on the cli.is the URL you copied in previous step. - Change directory to that of the cloned repository by running
cd k8s-basic-project
Note : Please refer steps mentioned in
README.mdfile of the repository hereafter. We will be thoroughly understanding each step mentioned in the file as we move ahead. So fire up those brain cells !!
Install Pre-requisites
First and foremost, we will make sure all pre-requisites are met as mentioned in the README.md file of the repository. Installations on their respective documentations are pretty straight-forward and easy to follow. later, verify your installations through cli.
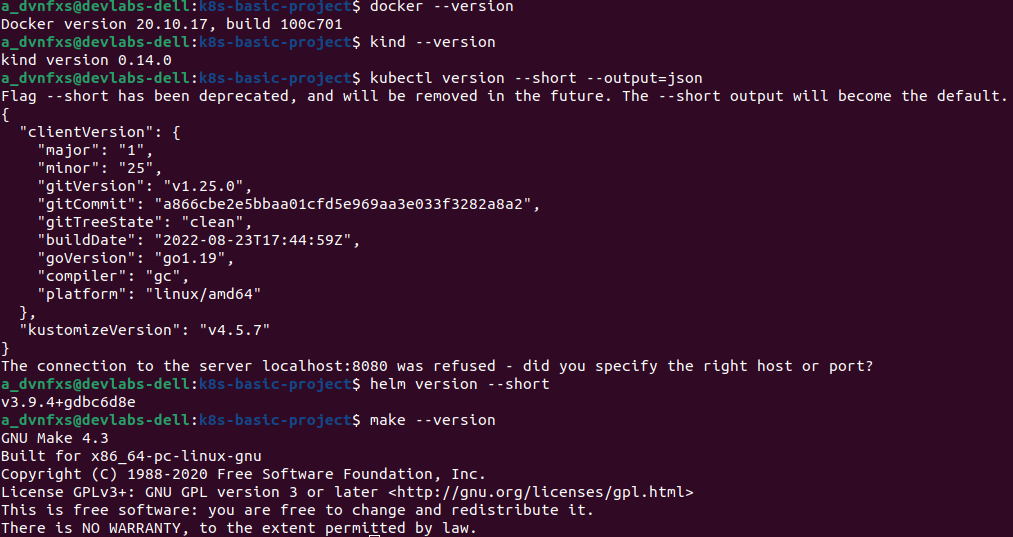 |
|---|
| Verification of Installations |
Containerize Your WebApp
Now, as we know that k8s is a container orchestration tool so we will be running our website in an isolated container. To run our application in containers we will have to create an image bundled with our application code & all dependencies needed to run our website.
Formerly, copy your static website code in website folder of the repository
cp -r <path_to_your_website_code>/* website/
To build a docker image, there is a generic Dockerfile already present in the repository. Let’s break it out for understanding :
FROM nginx: Pulls latest nginx image from docker hubLABEL maintainer="Ankur Singh": Just a label. you can add your name as maintainer if you wantCOPY website/ /usr/share/nginx/html/: Copies your website code to appropriate folderEXPOSE 80: Doesn’t actually expose any port but gives an idea about container ports to be exposed
Let’s go ahead to build the image and run your application in a docker container with a handy command
make run imageName=mywebapp imageTag=1.0 containerName=container_app hostPort=5000
What will this command do ?
- It will refer the
Makefilefile and execute the commands mentioned inruntarget. It will pass the parameters provided during execution to the commands being executed withing the target. If no arguments are provided, default values are taken which are mentioned in the beginning of theMakefile - First is
sudo docker build -t $(imageName):$(imageTag). It will refer theDockerfileand build an image called mywebapp:1.0 - Second command is
sudo docker run -d --rm --name $(containerName) -p $(hostPort):80 $(imageName):$(imageTag)which creates the container. It will use the image mywebapp:1.0 and create a container named container_app whose port 80 is exposed to port 5000 of your system
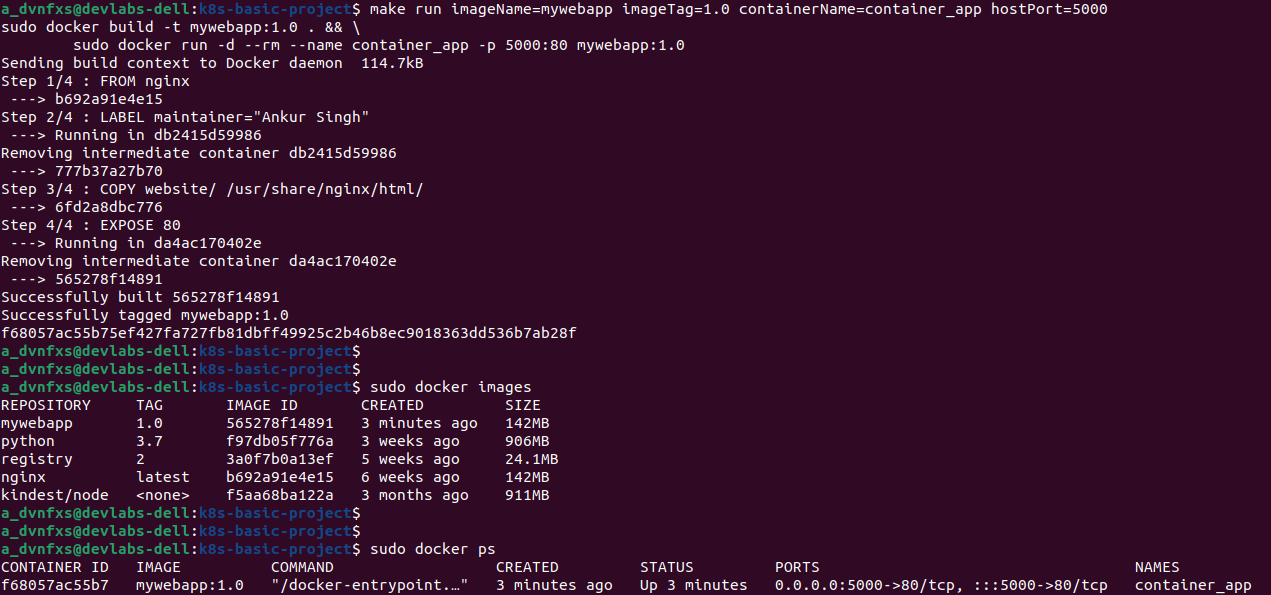 |
|---|
| Verification of WebApp Containerization |
Also visit 127.0.0.1:5000 in your browser to check if your static web application is accessible
Congrats !! You have successfully containerized your application.
Once tested, we won’t need this container anymore.
Free the resources by running make stop containerName=container_app (check upon the stop target in Makefile)
Create Local k8s Cluster & Image Registry
Moving further we will create our local cluster using kind and for the cluster to be able to get the image of our application (mywebapp:1.0), we will create a local image registry to store the image and link it to the cluster.
With our Makefile, this becomes a cakewalk. Run make create_kind_cluster_with_registry clusterName=webapplication
This command will execute the create_kind_cluster_with_registry target in make file. This particular target in turn calls create_kind_cluster which runs & connect_registry_to_kind targets which in turn call other targets and so on. (check upon other target calls & commands being executed in Makefile. In case of any doubt, feel free to ask in comments)
Eventually :
- A local kubernetes cluster called webapplication will be created. Verify it using
sudo kind get clusters - A local registry will be created as a container(local-registry) to store our website image. To verify, run
sudo docker ps | grep local-registry - Image registry will be connected to our local kubernetes cluster for it to pull our webapp image during deployment
If we follow the Makefile instructions properly, we can see that the creation of cluster and its connection to registry takes some initialization configuration files viz cluster/kind_config.yaml & cluster/kind_configmap.yaml. Let’s look at necessary instructions of those files.
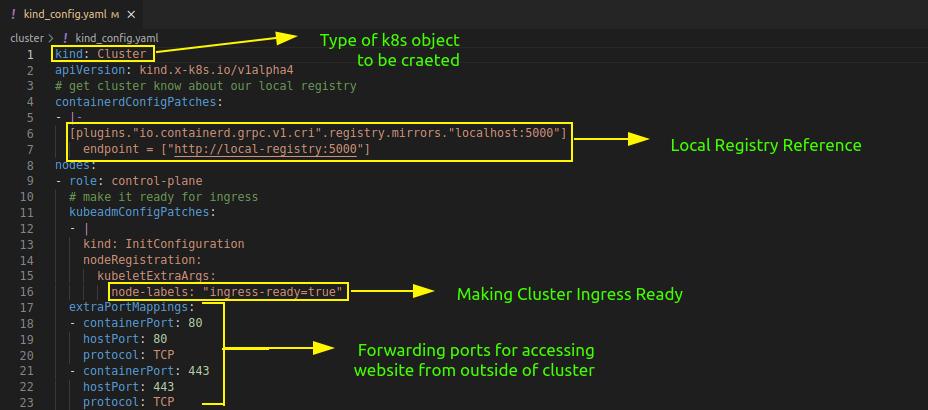 |
|---|
| kind_config.yaml for cluster configurations |
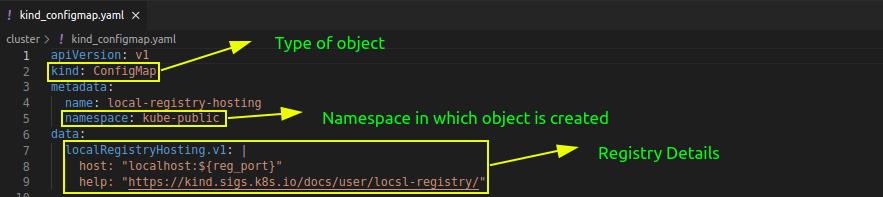 |
|---|
| kind_configmap.yaml for registry details |
Setting Up Cluster
With a local k8s cluster and image registry of our own, we are just three steps away to be all set to deploy our web application.
- Firstly, to make our image available to our cluster, we will have to push it to the local image registry.
- Run
make push_image_to_local_registry imageName=mywebapp imageTag=1.0 - It will first tag the image
mywebapp:1.0withlocalhost:5000/mywebapp:1.0 - Then it pushes it to the local image registry
- Run
- Secondly, to make our service accessible from outside the cluster via Ingress object, we will have to install ingress controller on it.
- Run
sudo kubectl apply -f https://raw.githubusercontent.com/kubernetes/ingress-nginx/main/deploy/static/provider/kind/deploy.yaml - It will install necessary resources for ingress object to be functional on the cluster
- To check upon all the resources, run ,
sudo kubectl get all -n ingress-nginx
- Run
- lastly, we will be customizing values of a few variables as per our application.
- in cluster/chart/Chart.yaml
- set name: mywebapp
- set version: 0.0.1
- set appVersion: 0.0.1
- in cluster/chart/values.yaml
- set appName: mywebapp
- set imageName: localhost:5000/mywebapp:1.0
- set serviceName: mywebapp-svc
- set hostName: mywebapp.com ( Ensure line
127.0.0.1 mywebapp.comis appended in /etc/hosts file of your system)
- in cluster/chart/Chart.yaml
Deploying Our Web Application, Finally !!
We have reached our destination !!
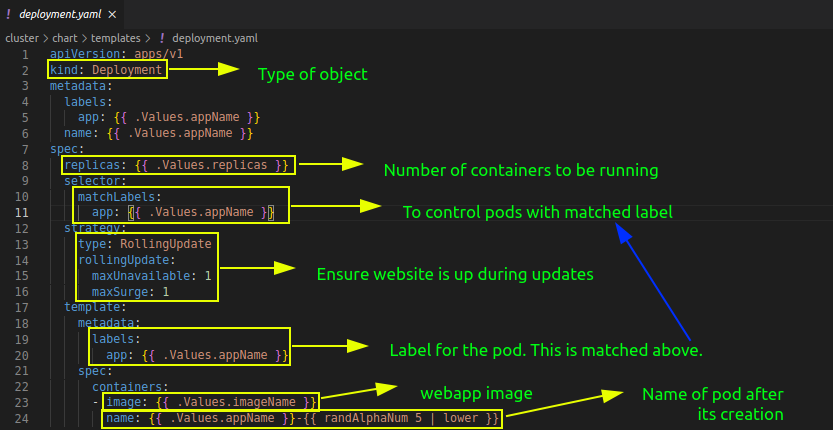
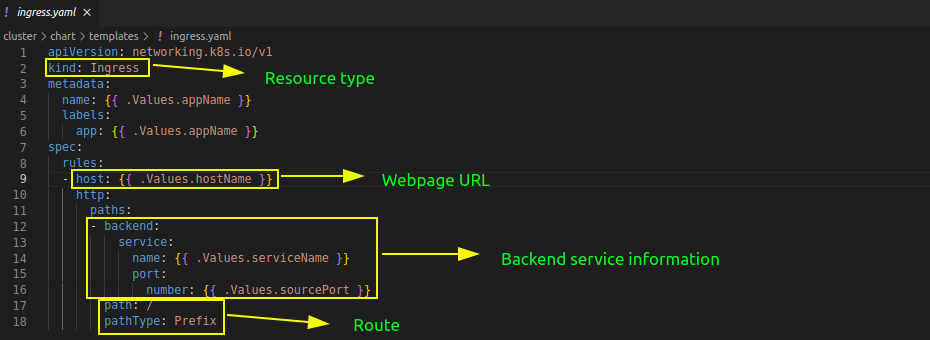
As we are using helm charts, we won’t have to create individual resources. Rather our deployment, service & ingress resources will be created by helm using definitions in cluster/chart/templates/ folder & values from cluster/chart/values.yaml file. Below is a overview of each of the resource definitions we are using :
 |
|---|
| deployment.yaml file for creating deployment resource |
 |
|---|
| service.yaml file for creating service resource |
 |
|---|
| ingress.yaml file for creating ingress resource |
And ofcourse, we have a target for deploying our application as well. So now that we know what each of the resource definition will be doing,we deploy your application by running make install_app appName=mywebapp
Simply visit mywebapp.com in your browser to feel good with your static web application up & running.
AND WE ARE DONE !!
This was all about our web application being deployed on local system using kubernetes. Its recommended to go ahead and play around with the manifest files and configration to explore & add new resources to your cluster.
You can even experiment deploying the cluster with the application over any of the Kubernetes Service on cloud platform and have your application accessed over the internet !
Leave a Comment